I
love parties and planning them! My daughter decided that this year she wanted a
Hello Kitty Party. I was thrilled because I really didn’t want to do another
Princess Party. (Don’t get me wrong love princesses but needed a change.)
And
so, I began thinking about what to do and how I wanted to decorate for her
party. My first step was to explore Pinterest.
As many of you know I LOVE Pinterest and all the knowledge and ideas
that it can lead you to. I began pinning all kinds of Hello Kitty related pins.
I found some really awesome ideas and I will begin to share how the party
transformed.
Goodie Bags:
I
was fortunate to stumble upon a bunch of Hello Kitty goodie bag items for super
cheap at my favorite store…Michaels. I
found a really cute idea to turn a plain white lunch bag into Hello Kitty.
Below is the Pinterest idea. (For the boys I created just a fun bag.)
I
saw on the blog, Little Pumpkin Grace …
Hudson too!, that she used baby food jars, painted the tops, filled it with
candy and then tied it up with a bow. I have been saving baby food jars for a
while so I was thrilled to have them available to do this project. We filled
them with Swedish Fish, my daughters favorite candy!
Cupcakes, Cake
and Yummy Goodies:
Usually
my mother is in charge of this area because she is very good at it and her
cakes are amazing. But this year I really wanted to take a turn at it. So, on Amazon, I found a cute Hello Kitty
cupcake stick and paper cup set that I bought.
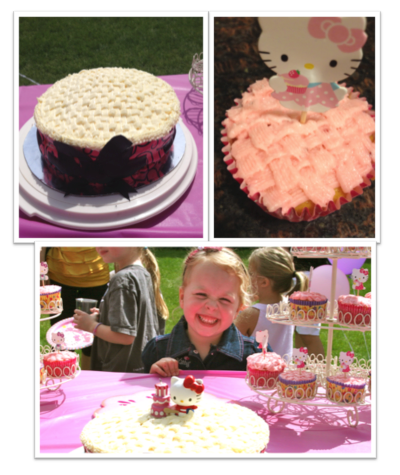
I made a vanilla cupcake and a homemade strawberry buttercream frosting.
This was a BIG hit.
I
created a basket weave on the top of each cupcake and then put a cute Hello
Kitty topper in each one. That was all I was going to do. But then, my daughter kept asking me, “Mommy,
will I have a cake at my party?” I am
not a cake person and really not much of a decorator but…anything for my
daughter! I found this really great design sugar paper that helped me create my
look. (One important note though…the weather the day of the party did not
cooperate. We were having it outdoors
and it was super hot, so things started to “melt” and fall apart. But it did look nice at first!)
Cookies:
I
found a really cute cookie mold and created pink and white chocolate covered
Oreos. They were yummy and looked cute.
Pink
chocolate dipped marshmallow pops, watermelon, strawberries, and grapes.
Adult
Food:
I
always enjoy when the mothers stay so they can have a time to hang out while
the party is going. I had some spinach dip, chips & pretzels, a roasted pepper
hummus and cucumber sandwiches.
Pink
lemonade of course!
Craft
and Games:
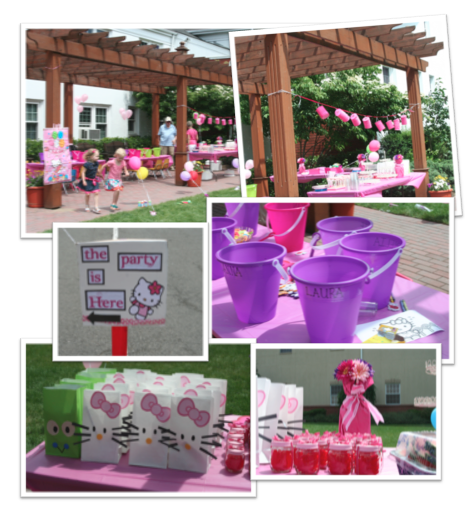
I
kept it simple this time. Found sand
buckets and shovels at…where else…Michaels, and bought a bunch of foam stickers
so that each child could could decorate their own.
I
found a Pin the Bow on Hello Kitty game and we played Duck Duck Goose. (An oldie
but a goodie). I also had out several bottles of bubbles; beach balls and a Velcro
ball catch as fillers. I kept the party this year to just one hour and it was a
perfect amount of time. (especially with twenty 4-year olds running around).
Color
Theme:
I
chose pink and went from there. I bought pink tablecloths, Hello Kitty plates,
and coordinating turquoise napkins. I found a really cute string of pink lanterns
to add as an accent and of course balloons. I bought some bouquets of colorful
artificial flowers and then found large felt flower placemats to put on the
table as accents and under the flowers. The vases for the flowers were Simply
Lemonade containers that I saved, wrapped tissue paper around and tied with a
bow.
Planning
Tips:
I
always have a piece of paper that lists the kid’s names that are coming, Food,
decorations, etc. I even drew a quick sketch of how I want it to look and where
things go. This is so important if you
are not having it at your house because you have to bring everything, like
garbage bags, a lighter for candles, coolers, utensils, supplies for crafts and extras of
everything! I always have a package of wipes too because they just come in
handy! (Even with a list I seem to always forget something imagine if I didn't have a list!)
Of
course, having help is always a plus. I am so fortunate that I have wonderful
parents and in-laws that always lend a hand.
Party
planning is and can be fun if you take it one project at a time and enjoy what
you are doing.
Happy
Planning!
P.S.
If you are on Pinterest you can type in Hello Kitty Party Ideas and there are numerous Boards to look at for help. I also have a Hello Kitty Board on Pinterest. You can find most of the
ideas that I used and give the credit that is due to the amazing crafters and
creative people you find on Pinterest.
Strawberry
Buttercream Icing Recipe:

 http://www.centsationalgirl.com/