Showing posts with label Cleaning. Show all posts

Cleaning Up

Cleaning...
I don’t know about you but it is necessary evil. I know that some may enjoy cleaning but for me it is not on the top of my “fun things to do” list.  Certainly it’s necessary, and I love a clean house.  But I can’t say that it brings me great joy to clean and scrub a toilet, wash floors, dust, etc.  But enough already with my open and honest assessment…

I recently decided I needed to keep up with the house cleaning on a daily basis and not just have this one major cleaning day only once a week.  On an everyday basis I clean up small things and keep the kitchen tidy and wipe down the bathrooms several times a week.  But that is not what I am talking about here.  I want to keep a generally clean house so that if an unexpected visitor pops in I am not completely embarrassed with how our house looks!  Not to mention that a clean home is a happy home (on many levels).  So where did I turn to try and help me figure out this dilemma?  Pinterest of course!

I explored all types of cleaning schedules; tips, articles you name it.  I read about a dozen blogs but nothing quite fit me exactly so I tweaked a few ideas and created a cleaning schedule that will work for me so that I don’t feel too overwhelmed.  Now, my husband really is super sweet and has never put any pressure on me to keep up with the house, but I know that he appreciates it and I must admit, I do too!  

For some this might not work, but for me I am on week three of a clean house and I am loving it!  My husband has even commented (unsolicited, I promise) on how clean the house has been and how he has appreciated all the work.  Yay!!  And an added bonus of this schedule is that I am not spending a ton of time each day cleaning.  Because let’s face it…I have little ones and spending extended periods of time cleaning is not always feasible.  A great quote that I found (and love) by Phyllis Diller:

“ Cleaning your house while your kids are still growing up is like shoveling the walk before it stops snowing.”

I laugh and give an “Amen” every time I read that quote!  Raising small children and allowing them to play does leave a mess that is continuous.  It’s natural to have that feeling of frustration when you just cleaned up one thing and turn around to find that Jr. has completely dumped out all his cars in one big pile and then moves on to Mr. Potato Head to shake out all the pieces, dumping his little cup of Goldfish on the floor in the process.  I don’t know, maybe that’s just my kids.  We are working on the whole, “once you are done playing with one thing put it away and then take out the next,” but that’s a continual work in progress and worthy of a whole other blog post at a later date!

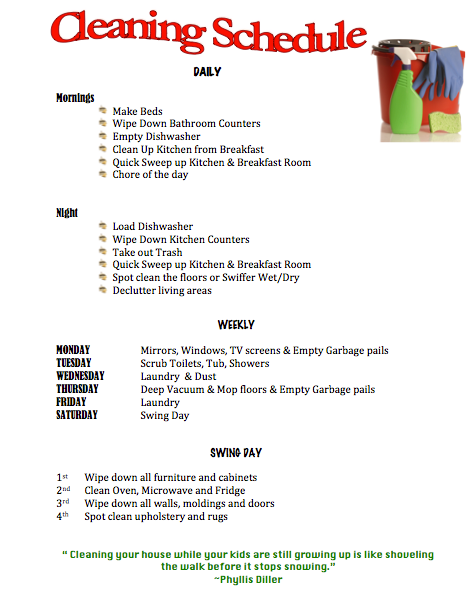
What I want to share with you is that this Cleaning Schedule offers me a chance to keep up my house and not feel overwhelmed with having to do one mass-cleaning day.  Been there, done that…and I was not loving it.  Below is the schedule. If you would like it use it please do, or if it is a great starting point and you need to tweak it for you, I have attached it below in as a Publisher doc that you can tweak.  I love to share and hope that this can be helpful to you as well.
Cleaning Schedule


Happy Cleaning!!
 Click to Download Schedule


Pinterest Board: Ideas for Cleaning
   
Products I like:
Walmart offers:  
This is great on Hardwood floors and Tile. I use this most days instead of a broom. It is plug-in so it doesn't lose its juice.


I use Swiffer for Dusting and the
Wet Mop for daily touch ups!


Invisible Glass. I found that this streaks less than other brands.


Mr. Clean Magic Erasers are great for the marks on the wall and TIP: Removes Soap scum on shower glass doors!!!

Linked up with:
mop it up mondays
TheBetterMom.com
Photobucket
The Taylor House

Cleaning Tip: Keep your toothbrush clean


I found this great article on how to keep your toothbrush clean on ehow.com. 
I am always looking for great tips and this article delivered!

How to Keep a Toothbrush Clean

Keeping your toothbrush clean is an essential part of good oral hygiene. Follow these tips to use regular household items to ensure your toothbrush's proper sterilization. A clean toothbrush means bacteria-free bristles.

Instructions
·      Clean your hands with soap and water before and after touching your toothbrush.
·      Wash your toothbrush after every use. Use your thumb to press against the bristles and allow the water to wash away food particles for at least 10 seconds.
·      Disinfect your toothbrush. Allow the toothbrush to soak in some antibacterial mouthwash that contains alcohol for 10 minutes after you brush. Soak the toothbrush in some vinegar every 2 weeks to kill remaining germs.
·      Store the toothbrush in a container that allows it to stand upright and exposes its bristles to air. Letting the toothbrush air dry keeps it mold-free. Consider buying two or three toothbrushes and rotating them so that each toothbrush will have at least 24 hours to dry out before you use it again.
·      Invest in a UV toothbrush cleaner. The light from the cleaner kills germs so that you don't have to.
·      Replace your toothbrush at the first signs of bent bristles. Buy new toothbrushes when you fall ill to avoid making yourself sick again. Otherwise, get a new toothbrush every 3 to 4 months.

Tips & Warnings
    Replace children's toothbrushes every 2 to 3 months.
    Mix baking soda and water and soak the toothbrush in that solution if you don't have mouthwash.
    Soak your toothbrush in a bit of hydrogen peroxide daily if you don't have vinegar on hand.
    Don't share toothbrushes or allow someone else's toothbrush to touch yours.
    Avoid purchasing closed toothbrush protectors. These protectors keep the toothbrush bristles moist and create a breeding ground for microorganisms.
    Avoid placing your toothbrush in a dishwasher, as you may damage it.


Linked up with:

mop it up mondays

Cleaning Tip: Uses for Vinegar

http://www.thisoldhouse.com/toh
I found this great article on 10 Uses for Vinegar over at This Old House. Although some I might not use others were helpful and never knew before reading this article. Let me know if you use any of the tips and how it works out for you.
Happy Cleaning!


10 Uses for Vinegar


Peel off Wallpaper

Using a sponge or spray bottle, saturate wallpaper with a solution of equal parts vinegar and water. Let stand for several minutes, then start scraping. The paper should come off easily.

Revive Old Paintbrushes

Soak gunked-up nylon brushes in hot vinegar for up to 30 minutes to remove paint and soften the bristles. Afterward, wash them in hot, soapy water, brushing off paint as needed, then rinse and let dry—good as new.

Test Your Soil's pH

Place a handful of dirt into a small container and sprinkle vinegar on it. If it fizzes, the soil is alkaline; adjust the pH with an acid amendment.

Remove Mineral Deposits from Showerheads

Pour ½ cup of warm vinegar into a resealable plastic bag. Drop in the showerhead, making sure the holes are submerged, and seal the bag. Let sit for 1 hour. Rinse and wipe clean, then reattach

Keep Paint from Peeling

Before painting galvanized metal or concrete, wipe down the object or surface with vinegar, using a sponge or lint-free cloth. This little trick will help your paint job last longer.

Banish Decals and Stickers

Dab vinegar onto stubborn price tags and stickers affixed to glass, plastic, or wood. Scrape the surface clean, then rub the area with more vinegar to remove any sticky residue.

Wipe off Wax or Polish Buildup

On wood surfaces or furniture, use a mix of equal parts vinegar and water to remove buildup, wiping with the grain of the wood. For leather furniture, make a weaker solution—2 parts water to 1 part vinegar—and rub the material using a circular motion.

Whiten Grout

For stubborn stains on ceramic-tile surfaces, scrub grout with a stiff-bristled toothbrush dipped in vinegar and watch it whiten before your eyes.

CAUTION: Vinegar can harm marble and other natural stone surfaces, so avoid using on these materials. Test a small, unobtrusive area first if you want to be extra careful.

Dissolve Rust

Soak old tools and corroded nuts and bolts in vinegar for a few days. Rinse them with water and watch rust and scale disappear.

Protect your Hands

Caustic ingredients in concrete, drywall, and other building materials can cause painful skin irritation. If you handle them often, rinse your hands with a mixture of 1 part vinegar to 2 parts water before washing up—the acid neutralizes their alkaline content.
For Full Article and links to more tips go to:

Sharpie Marker Oh NO!

Have you ever had a moment where you are frozen because you just noticed that your child has used a Sharpie Marker (yes...the permanent one) on your tile floor and think how am I ever going to get that off? Well, I have a solution. It happened to me and I got it off the tile floor. I ran quickly and got my nail Polish remover and it wiped right off! Nail polish remover can be used for more than just to take off your nail polish.  I found the following article that has more useful tips from Reader's Digest titled:

How to Really Use Nail Polish Remover: This manicure essential has so many uses beyond taking off last week's hue.


This is what it suggests:
Remove stains from china Your bone china has assorted stains from years of use. Spruce up your set by rubbing soiled areas with nail polish remover. Clean spots with a cotton swab and then wash dishes as usual.

Eliminate ink stains If the ink stains on your skin won’t come off with soap and water, they are probably not water-soluble. Try using nail polish remover instead. Take a cotton ball and wipe the affected areas with the solution. Once the ink stains are gone, wash skin with soap and water. Nail polish remover can also eliminate ink stains on the drum of your clothes dryer.
Rub paint off windows Spare your nails the next time you want to remove paint on a window. Working in a well-ventilated area, dab on nail polish remover in small sections. Let the solution remain on the painted areas for a few minutes before rubbing it off with a cloth. Once finished, take a damp cloth and go over the areas again.
Remove stickers from glass Scraping price stickers from glass objects can be messy, and it often leaves behind a gummy adhesive that attracts dirt and is sticky to the touch. Remove the stickers and clean up the residual glue by wiping the area with acetone-based nail polish remover. The same method can be used for removing stickers and sticky residue from metal surfaces.
Dissolve melted plastic Ever get too close to a hot metal toaster with a plastic bag of bread or bagels? The resulting mess can be a real cleaning challenge. But don’t let a little melted plastic ruin a perfectly good appliance. Eliminate the sticky mess with nail polisher remover. First unplug the toaster and wait for it to cool. Then pour a little nail polish remover on a soft cloth and gently rub over the damaged areas. Once the melted plastic is removed, wipe with a damp cloth and dry with a paper towel. Your toaster is now ready for the next round of bagels. The same solution works for melted plastic on curling irons.
Unhinge superglue Superglue will stick tenaciously to just about anything, including your skin. And trying to peel it off your fingers can actually cause skin damage. Instead, soak a cotton ball with acetone-based nail polish remover and hold it on the skin until the glue dissolves.
Clean vinyl shoes Patent-leather shoes may not reflect up, but they do show off scuff marks, as will white or other light-colored vinyl shoes. To remove the marks, rub them lightly but briskly with a soft cloth or paper towel dipped in nail polish remover. Afterward, remove any residue with a damp cloth.
Keep watches clean Tired of looking at your watch and seeing unsightly scratches when you check the time? Get rid of them with nail polish remover. If the face of your watch is made from unbreakable plastic, rub the remover over the scratches until they diminish or disappear.
Clean computer keyboards You can keep computer keyboards clean with nail polish remover and an old toothbrush. Simply moisten the brush with remover and lightly rub the keys.
Dilute correction fluid To take the goop out of correction fluid or old nail polish, dilute it with nail polish remover. Pour just a few drops into the bottle and then shake. Add a little more polish remover to the solution, if needed, to attain the desired consistency.
Prep brass for re-lacquering Old or damaged lacquer coatings on brass can be safely removed with nail polish remover. Take a soft cloth and pour a small amount of remover on it. Rub the brass object until the old lacquer has been lifted. Your brass item is now ready to be polished or professionally re-lacquered.

Whole article can be found by the following link:
http://www.rd.com/home/how-to-really-use-nail-polish-remover/

Cleaning Tip: Shower Curtains


http://bathroom-idea.blogspot.com/2011/05/bathroom-shower-curtain.html

Shower curtains can be renovated by being washed, on gentle cycle, with a pint (or less) of white vinegar.

*Use the vinegar only if it has a distinct smell ,otherwise just detergent on the gentle cycle. The gentle cycle for me seems to have the  best outcome. 


Cleaning Tip: Oven


To clean up spills in your oven, sprinkle the spills immediately with salt. When the oven has cooled, brush away the burnt-on food with a damp sponge.


Cleaning Tip


To disinfect smelly sponges, wash sponge thoroughly, then microwave it while it is wet, for a short period. When you see steam from the sponge, the bacteria in the sponge will be dead. Remove carefully, it will be hot! Wash the sponge thoroughly before use. **Make sure the sponge has no metal components!**

Cleaning Tips Monday

Cleaning your microwave is easy peasy.  Put a bowl of vinegar and water in the microwave, and cook on high for 3 minutes. Then just wipe out the microwave with a rag. The vinegar will take care of that funky popcorn/bacon smell combo most everyone's microwave has, and the steam will soften even the most yucky splatter that's in your microwave.
http://www.curbly.com/users/badbadivy/posts/1011-clean-like-a-maid#jump