Clean Up, Clean Up, Everybody do their Share...


I don’t know about you but my kids seem to make a huge mess…daily. They take out virtually every toy we own, and then they keep moving onto the next thing.  At first I tried the old “you can’t play with the next toy until you clean up what you are currently playing with” routine.  HAHA…in theory that worked for about a week and then slowly that rule went out the door. That may work for some (so keep it up if it works for you!) but I needed to find some ideas that would work for my kids. 

My 18 month old
I know that some might feel that kids should just learn to do chores and pick up toys because that is what is expected.  And while I do agree with this, my kids are still little so it’s a training process and they need to learn this but with some reward. Even if the reward is verbal or a hug.  As they get older, expectations will become different…and so will the reward.

Here are some suggestions:

·      You can use some fun ideas below to make the process easier.
·      Ask your child to only pick up one or two things so they don’t feel overwhelmed. Give specific instructions on what they need to clean up.  Don’t just say, “OK, go clean up!”  Tell them exactly what needs to be done, a little at a time.
·      Have bins for toys to go in that are reachable for kids. Even better…organize them by items that are similar.
·      However they clean up is fine. If it is just thrown in the bin or on the shelf just deal with it because you don’t want to start fixing it in front of them and discourage them from doing it again. (If there is a need to reorganize, don’t do in front of them.  Find time to sneak away and fix it later.)
·      Reward them for the effort. I use a marble system and they get rewards after five marbles earned. Whatever works for you and your child, but seriously…what kid doesn’t like a reward even if it is a hug and a big “thank you”!!
·      Limit the amount of toys out at a time, not just one a few can be out. This will help with any cleanup time.
·      Give yourself some time to clean up so that it is not a rushed experience to try to get out the door. For me that is where it can cause a problem or even a melt down.
·      Give a warning time so they know playtime is ending and the cleanup begins!
Say Thank You!! Make sure they know that you are proud of them for helping and cleaning up. For my daughter that really goes a long way.


  Photobucket

Download the list:
Fun Clean Up Ideas.docx

Linked up with:

Lasso the Moon

Hello Kitty Party


I love parties and planning them! My daughter decided that this year she wanted a Hello Kitty Party. I was thrilled because I really didn’t want to do another Princess Party. (Don’t get me wrong love princesses but needed a change.)


And so, I began thinking about what to do and how I wanted to decorate for her party. My first step was to explore Pinterest.  As many of you know I LOVE Pinterest and all the knowledge and ideas that it can lead you to. I began pinning all kinds of Hello Kitty related pins. I found some really awesome ideas and I will begin to share how the party transformed. 
                         

Hello Kitty Party 2 


 Goodie Bags:

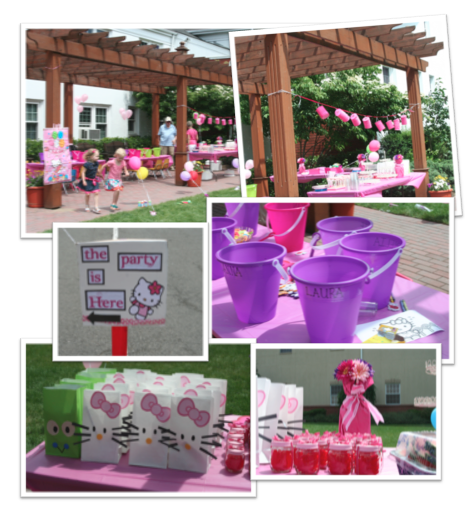
I was fortunate to stumble upon a bunch of Hello Kitty goodie bag items for super cheap at my favorite store…Michaels.  I found a really cute idea to turn a plain white lunch bag into Hello Kitty. Below is the Pinterest idea. (For the boys I created just a fun bag.)

I saw on the blog, Little Pumpkin Grace … Hudson too!, that she used baby food jars, painted the tops, filled it with candy and then tied it up with a bow. I have been saving baby food jars for a while so I was thrilled to have them available to do this project. We filled them with Swedish Fish, my daughters favorite candy!
Photobucket 


  Cupcakes, Cake and  Yummy Goodies:

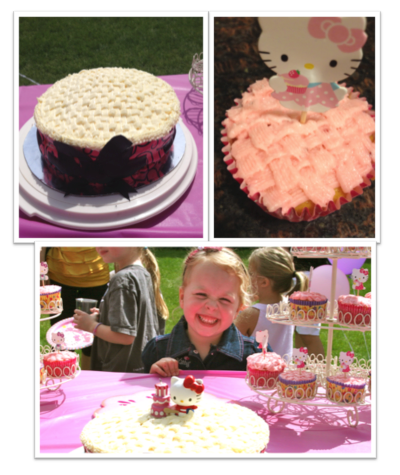
Usually my mother is in charge of this area because she is very good at it and her cakes are amazing. But this year I really wanted to take a turn at it.  So, on Amazon, I found a cute Hello Kitty cupcake stick and paper cup set that I bought.  I made a vanilla cupcake and a homemade strawberry buttercream frosting. This was a BIG hit.

I created a basket weave on the top of each cupcake and then put a cute Hello Kitty topper in each one. That was all I was going to do.  But then, my daughter kept asking me, “Mommy, will I have a cake at my party?”  I am not a cake person and really not much of a decorator but…anything for my daughter! I found this really great design sugar paper that helped me create my look. (One important note though…the weather the day of the party did not cooperate.  We were having it outdoors and it was super hot, so things started to “melt” and fall apart.  But it did look nice at first!)


Cookies:
I found a really cute cookie mold and created pink and white chocolate covered Oreos. They were yummy and looked cute.
Pink chocolate dipped marshmallow pops, watermelon, strawberries, and grapes.

Adult Food:

I always enjoy when the mothers stay so they can have a time to hang out while the party is going. I had some spinach dip, chips & pretzels, a roasted pepper hummus and cucumber sandwiches.

Pink lemonade of course!
Hello Kitty Party 1                          


Craft and Games:

I kept it simple this time.  Found sand buckets and shovels at…where else…Michaels, and bought a bunch of foam stickers so that each child could could decorate their own.
I found a Pin the Bow on Hello Kitty game and we played Duck Duck Goose. (An oldie but a goodie). I also had out several bottles of bubbles; beach balls and a Velcro ball catch as fillers. I kept the party this year to just one hour and it was a perfect amount of time. (especially with twenty 4-year olds running around).

Color Theme:

I chose pink and went from there. I bought pink tablecloths, Hello Kitty plates, and coordinating turquoise napkins. I found a really cute string of pink lanterns to add as an accent and of course balloons. I bought some bouquets of colorful artificial flowers and then found large felt flower placemats to put on the table as accents and under the flowers. The vases for the flowers were Simply Lemonade containers that I saved, wrapped tissue paper around and tied with a bow.

Planning Tips:

I always have a piece of paper that lists the kid’s names that are coming, Food, decorations, etc. I even drew a quick sketch of how I want it to look and where things go.  This is so important if you are not having it at your house because you have to bring everything, like garbage bags, a lighter for candles, coolers, utensils, supplies for crafts and extras of everything! I always have a package of wipes too because they just come in handy! (Even with a list I seem to always forget something imagine if I didn't have a list!)

Of course, having help is always a plus. I am so fortunate that I have wonderful parents and in-laws that always lend a hand.
Party planning is and can be fun if you take it one project at a time and enjoy what you are doing.

Happy Planning!

P.S.
If you are on Pinterest you can type in Hello Kitty Party Ideas and there are numerous Boards to look at for help. I also have a Hello Kitty Board on Pinterest. You can find most of the ideas that I used and give the credit that is due to the amazing crafters and creative people you find on Pinterest.

Strawberry Buttercream Icing Recipe:



Photobucket
http://www.centsationalgirl.com/


Kids Co-op

Cleaning Tip: Uses for Vinegar

http://www.thisoldhouse.com/toh
I found this great article on 10 Uses for Vinegar over at This Old House. Although some I might not use others were helpful and never knew before reading this article. Let me know if you use any of the tips and how it works out for you.
Happy Cleaning!


10 Uses for Vinegar


Peel off Wallpaper

Using a sponge or spray bottle, saturate wallpaper with a solution of equal parts vinegar and water. Let stand for several minutes, then start scraping. The paper should come off easily.

Revive Old Paintbrushes

Soak gunked-up nylon brushes in hot vinegar for up to 30 minutes to remove paint and soften the bristles. Afterward, wash them in hot, soapy water, brushing off paint as needed, then rinse and let dry—good as new.

Test Your Soil's pH

Place a handful of dirt into a small container and sprinkle vinegar on it. If it fizzes, the soil is alkaline; adjust the pH with an acid amendment.

Remove Mineral Deposits from Showerheads

Pour ½ cup of warm vinegar into a resealable plastic bag. Drop in the showerhead, making sure the holes are submerged, and seal the bag. Let sit for 1 hour. Rinse and wipe clean, then reattach

Keep Paint from Peeling

Before painting galvanized metal or concrete, wipe down the object or surface with vinegar, using a sponge or lint-free cloth. This little trick will help your paint job last longer.

Banish Decals and Stickers

Dab vinegar onto stubborn price tags and stickers affixed to glass, plastic, or wood. Scrape the surface clean, then rub the area with more vinegar to remove any sticky residue.

Wipe off Wax or Polish Buildup

On wood surfaces or furniture, use a mix of equal parts vinegar and water to remove buildup, wiping with the grain of the wood. For leather furniture, make a weaker solution—2 parts water to 1 part vinegar—and rub the material using a circular motion.

Whiten Grout

For stubborn stains on ceramic-tile surfaces, scrub grout with a stiff-bristled toothbrush dipped in vinegar and watch it whiten before your eyes.

CAUTION: Vinegar can harm marble and other natural stone surfaces, so avoid using on these materials. Test a small, unobtrusive area first if you want to be extra careful.

Dissolve Rust

Soak old tools and corroded nuts and bolts in vinegar for a few days. Rinse them with water and watch rust and scale disappear.

Protect your Hands

Caustic ingredients in concrete, drywall, and other building materials can cause painful skin irritation. If you handle them often, rinse your hands with a mixture of 1 part vinegar to 2 parts water before washing up—the acid neutralizes their alkaline content.
For Full Article and links to more tips go to:

Praise

As I sit down each morning to read my devotions there are days were God's word is  encouraging, thought provoking,  a reminder of His truths


Then there are days His words are pointing right at me, listen to what I have to say.  Words that are for what I am going through at that very moment. 


The Lord is good and His Love endures forever. He reminds us to start each day anew and to Praise Him for each day. Don't worry about tomorrow for He is in control. No matter what may come of your day today know the Lord loves you and Praise Him!


Psalm 118
Give thanks to the Lord,(A) for he is good;(B)
    his love endures forever.(C)
Let Israel say:(D)
    “His love endures forever.”(E)
Let the house of Aaron say:(F)
    “His love endures forever.”
Let those who fear the Lord(G) say:
    “His love endures forever.”
21 I will give you thanks, for you answered me;(AK)
    you have become my salvation.(AL)
22 The stone(AM) the builders rejected
    has become the capstone;(AN)
23 the Lord has done this,
    and it is marvelous(AO) in our eyes.
24 This is the day the Lord has made;
    let us rejoice and be glad(AP) in it.
25 Lord, save us;(AQ)
    Lord, grant us success.
26 Blessed is he who comes(AR) in the name of the Lord.
    From the house of the Lord we bless you.[a](AS)
27 The Lord is God,(AT)
    and he has made his light shine(AU) upon us.
With boughs in hand,(AV) join in the festal procession
    up[b] to the horns of the altar.(AW)
28 You are my God, and I will give you thanks;
    you are my God,(AX) and I will exalt(AY) you.
29 Give thanks to the Lord, for he is good;
    his love endures forever.
New International Version 1984 (NIV1984)Holy Bible, New International Version®, NIV® Copyright © 1973, 1978, 1984 by Biblica, Inc.® Used by permission. All rights reserved worldwide.

Providence


I was reflecting on a verse that I claim as My life verse the other day: Romans 8:28. Through life we all go through many different trials. For me the question of “why” is often in my head and in my prayer life, I am human but then I go back to the verse:

Romans 8:28 And we know that God causes all things to work together for good to those who love God, to those who are called according to His purpose. (NASB: Lockman).

He promises that all will work out for the good. His plan is greater than ours. I read a commentary and I included it below:

By Raymond Ortlund
The hand of God is at the helm. He’s steering us through the storms of life toward home, toward a safe haven. And He takes care to order all the events of our lives right now to speed us on our way there. This is what we call Providence-- God’s overruling hand at work everywhere in a fallen world. The Providence of God is clearly taught from one end of the Bible to the other. And our confidence in the Providence of God is a faith so bold, so demanding, so unapologetic, that we cannot believe it without being transformed. Either all things work together for our good, or nothing makes sense. So let’s be bold about it. Let’s either be transformed Christians or bitter skeptics, because we cannot just sort of believe Romans 8:28. We either believe it or we doubt it. There is no middle ground. (Romans 8:28).

I like the visual of God at the helm and He is steering me through life. That is a reassurance and when I am weak and feel that question of “why” and worry sets in, I need to go back to the verse and remember what God’s Word promises.

Do you ever question why? Do you ever just get frustrated because you can’t see where this is going and how will it end up? If so you are not alone. I would love to hear how you deal with these questions and how you move through trials. Comment Below.


Linked up with:

Sharpie Marker Oh NO!

Have you ever had a moment where you are frozen because you just noticed that your child has used a Sharpie Marker (yes...the permanent one) on your tile floor and think how am I ever going to get that off? Well, I have a solution. It happened to me and I got it off the tile floor. I ran quickly and got my nail Polish remover and it wiped right off! Nail polish remover can be used for more than just to take off your nail polish.  I found the following article that has more useful tips from Reader's Digest titled:

How to Really Use Nail Polish Remover: This manicure essential has so many uses beyond taking off last week's hue.


This is what it suggests:
Remove stains from china Your bone china has assorted stains from years of use. Spruce up your set by rubbing soiled areas with nail polish remover. Clean spots with a cotton swab and then wash dishes as usual.

Eliminate ink stains If the ink stains on your skin won’t come off with soap and water, they are probably not water-soluble. Try using nail polish remover instead. Take a cotton ball and wipe the affected areas with the solution. Once the ink stains are gone, wash skin with soap and water. Nail polish remover can also eliminate ink stains on the drum of your clothes dryer.
Rub paint off windows Spare your nails the next time you want to remove paint on a window. Working in a well-ventilated area, dab on nail polish remover in small sections. Let the solution remain on the painted areas for a few minutes before rubbing it off with a cloth. Once finished, take a damp cloth and go over the areas again.
Remove stickers from glass Scraping price stickers from glass objects can be messy, and it often leaves behind a gummy adhesive that attracts dirt and is sticky to the touch. Remove the stickers and clean up the residual glue by wiping the area with acetone-based nail polish remover. The same method can be used for removing stickers and sticky residue from metal surfaces.
Dissolve melted plastic Ever get too close to a hot metal toaster with a plastic bag of bread or bagels? The resulting mess can be a real cleaning challenge. But don’t let a little melted plastic ruin a perfectly good appliance. Eliminate the sticky mess with nail polisher remover. First unplug the toaster and wait for it to cool. Then pour a little nail polish remover on a soft cloth and gently rub over the damaged areas. Once the melted plastic is removed, wipe with a damp cloth and dry with a paper towel. Your toaster is now ready for the next round of bagels. The same solution works for melted plastic on curling irons.
Unhinge superglue Superglue will stick tenaciously to just about anything, including your skin. And trying to peel it off your fingers can actually cause skin damage. Instead, soak a cotton ball with acetone-based nail polish remover and hold it on the skin until the glue dissolves.
Clean vinyl shoes Patent-leather shoes may not reflect up, but they do show off scuff marks, as will white or other light-colored vinyl shoes. To remove the marks, rub them lightly but briskly with a soft cloth or paper towel dipped in nail polish remover. Afterward, remove any residue with a damp cloth.
Keep watches clean Tired of looking at your watch and seeing unsightly scratches when you check the time? Get rid of them with nail polish remover. If the face of your watch is made from unbreakable plastic, rub the remover over the scratches until they diminish or disappear.
Clean computer keyboards You can keep computer keyboards clean with nail polish remover and an old toothbrush. Simply moisten the brush with remover and lightly rub the keys.
Dilute correction fluid To take the goop out of correction fluid or old nail polish, dilute it with nail polish remover. Pour just a few drops into the bottle and then shake. Add a little more polish remover to the solution, if needed, to attain the desired consistency.
Prep brass for re-lacquering Old or damaged lacquer coatings on brass can be safely removed with nail polish remover. Take a soft cloth and pour a small amount of remover on it. Rub the brass object until the old lacquer has been lifted. Your brass item is now ready to be polished or professionally re-lacquered.

Whole article can be found by the following link:
http://www.rd.com/home/how-to-really-use-nail-polish-remover/